I. Photoshop Artists
1. Natalia Seth
![](https://static.wixstatic.com/media/55ae8a_2940117bb9914ffb8aeb726df137e477~mv2.jpg/v1/fill/w_590,h_585,al_c,q_80,enc_auto/55ae8a_2940117bb9914ffb8aeb726df137e477~mv2.jpg)
![](https://static.wixstatic.com/media/55ae8a_5fd3a73e919040b2ab4e3529c3b1ad43~mv2.jpg/v1/fill/w_442,h_546,al_c,q_80,enc_auto/55ae8a_5fd3a73e919040b2ab4e3529c3b1ad43~mv2.jpg)
Natalia aka @escapingyouth has been uploading her photography and editorial works for a long time. Back when editing started to become a trend on instagram. She posts a lot of colorful concept editing of herself.
NATALIA'S LINKS:
instagram: @escapingyouth
2. Steven Lee
![](https://static.wixstatic.com/media/55ae8a_e4eb4c0b8c114d4a86f30effd2627ef1~mv2.jpg/v1/fill/w_413,h_568,al_c,q_80,enc_auto/55ae8a_e4eb4c0b8c114d4a86f30effd2627ef1~mv2.jpg)
![](https://static.wixstatic.com/media/55ae8a_ab9d1ea3dc1b467f8ff3cb9238ca3a45~mv2.jpg/v1/fill/w_438,h_558,al_c,q_80,enc_auto/55ae8a_ab9d1ea3dc1b467f8ff3cb9238ca3a45~mv2.jpg)
Steven Lee's style of editing focuses on editorial portraits. Making unrealistic proportions of humans. He has a distinct taste to his style.
STEVEN'S LINKS:
instagram: @stevenoclock
3. Vanessa Rivera on Behance
![](https://static.wixstatic.com/media/55ae8a_2d970fb6d49a49d0a1fcc97998583740~mv2.png/v1/fill/w_980,h_1225,al_c,q_90,usm_0.66_1.00_0.01,enc_auto/55ae8a_2d970fb6d49a49d0a1fcc97998583740~mv2.png)
![](https://static.wixstatic.com/media/55ae8a_6732524fe38f4ec5b6e0374f0524389d~mv2.png/v1/fill/w_980,h_1225,al_c,q_90,usm_0.66_1.00_0.01,enc_auto/55ae8a_6732524fe38f4ec5b6e0374f0524389d~mv2.png)
Vanessa is a well known digital artist. Her work has surfed online on multiple platforms and also showcased offline. Her works reveal her view of human experience with a great emphasis on humanity's pristine spiritual essence, she says.
VANESSA'S LINKS:
instagram: @the_life_of_aivax
4. Aditya Aryanto
![](https://static.wixstatic.com/media/55ae8a_140315d2a74f4d7792c315157a103c5f~mv2.jpg/v1/fill/w_572,h_575,al_c,q_80,enc_auto/55ae8a_140315d2a74f4d7792c315157a103c5f~mv2.jpg)
![](https://static.wixstatic.com/media/55ae8a_a4d4f67f4fa8462d80761e82430d260b~mv2.jpg/v1/fill/w_573,h_578,al_c,q_80,enc_auto/55ae8a_a4d4f67f4fa8462d80761e82430d260b~mv2.jpg)
Aditya is a local photoshop artist. He takes random objects and give a surrealistic twist to it. He often plays around animal images. Adit also has a special liking for cats :D
ADIT'S LINKS:
instagram: @ditpict
5. Faiz Saadad
![](https://static.wixstatic.com/media/55ae8a_153818f5d63242e095e0bdf110c44fdb~mv2.jpg/v1/fill/w_547,h_413,al_c,q_80,enc_auto/55ae8a_153818f5d63242e095e0bdf110c44fdb~mv2.jpg)
![](https://static.wixstatic.com/media/55ae8a_8f68ce5699ac4f2dbb0da8f939eaa8aa~mv2.jpg/v1/fill/w_546,h_342,al_c,q_80,enc_auto/55ae8a_8f68ce5699ac4f2dbb0da8f939eaa8aa~mv2.jpg)
Faiz's editing style is quite different from the rest. Faiz makes hilarious of himself together with celebrities. This gave him a good amount of following due to to how realistic he's able to create them.
FAIZ'S LINKS
instagram: @faizsadad
II. Tutorial Sites
1. Tutorial site by Vanessa herself
![](https://static.wixstatic.com/media/55ae8a_45adb5d061ce45ab9f0957d8b906df3a~mv2.jpg/v1/fill/w_980,h_500,al_c,q_85,usm_0.66_1.00_0.01,enc_auto/55ae8a_45adb5d061ce45ab9f0957d8b906df3a~mv2.jpg)
Vanessa shares her secrets to how she's able to create her works that she posts online. She teaches more intermediate level of photo manipulation.
This site is more straightforward on explaining the basics of photoshop.
![](https://static.wixstatic.com/media/55ae8a_b99436376d884ae18acedd083c0cc2ed~mv2.jpg/v1/fill/w_980,h_525,al_c,q_85,usm_0.66_1.00_0.01,enc_auto/55ae8a_b99436376d884ae18acedd083c0cc2ed~mv2.jpg)
3. Mas Aji Channel
For people who are more of a visual learner, Mas Aji provides an Indonesian explanation on how to use photoshop. He also has made a few other parts that you can check in his channel.
![](https://static.wixstatic.com/media/55ae8a_4ea7a6ca6d954331aedd6c21da2c69b9~mv2.jpg/v1/fill/w_980,h_455,al_c,q_85,usm_0.66_1.00_0.01,enc_auto/55ae8a_4ea7a6ca6d954331aedd6c21da2c69b9~mv2.jpg)
4. Gilang Al-arisy
This is an alternative Indonesian video explaining the basics of photoshop.
![](https://static.wixstatic.com/media/55ae8a_453c72eaec254d03900659c977c4fa54~mv2.jpg/v1/fill/w_980,h_674,al_c,q_85,usm_0.66_1.00_0.01,enc_auto/55ae8a_453c72eaec254d03900659c977c4fa54~mv2.jpg)
5. Dafidell
This is website version explaining in more detail of the tools and principles of photoshop.
![](https://static.wixstatic.com/media/55ae8a_dec3b4b00a3a4c1b93cb20c02a53aa23~mv2.jpg/v1/fill/w_980,h_533,al_c,q_85,usm_0.66_1.00_0.01,enc_auto/55ae8a_dec3b4b00a3a4c1b93cb20c02a53aa23~mv2.jpg)
III. In Class Exercise
1. Selecting Objects & Color Manipulation In class we learned the usage of the selection tool, marquee tool, lasso tool and manipulating colors.
![](https://static.wixstatic.com/media/a27d24_64618b0f38fd4dc4b8d8b08e9cd385d9~mv2.jpg/v1/fill/w_67,h_59,al_c,q_80,enc_auto/a27d24_64618b0f38fd4dc4b8d8b08e9cd385d9~mv2.jpg)
a. Quick Selection Tool b. Rectangular Marquee Tool c. Lasso Tool
![](https://static.wixstatic.com/media/55ae8a_55c046be29344b0f841f46b8b81b46c3~mv2.jpg/v1/fill/w_699,h_611,al_c,q_85,enc_auto/55ae8a_55c046be29344b0f841f46b8b81b46c3~mv2.jpg)
a. Quick Selection Tool
i. Selecting the image with quick selection tool then making a layer copy.
![](https://static.wixstatic.com/media/55ae8a_34e7a8bdfdd04c6c9b217f422aba7f6e~mv2.png/v1/fill/w_665,h_590,al_c,q_90,enc_auto/55ae8a_34e7a8bdfdd04c6c9b217f422aba7f6e~mv2.png)
ii. Adjusting the colors using hues and saturations.
b. Rectangular Marquee tool c. Polygonal Lasso Tool
![](https://static.wixstatic.com/media/55ae8a_84a47a61191e4a68996c9c8205b6ef5e~mv2.png/v1/fill/w_700,h_607,al_c,q_90,enc_auto/55ae8a_84a47a61191e4a68996c9c8205b6ef5e~mv2.png)
![](https://static.wixstatic.com/media/55ae8a_b214c6cd9d2c4c898fd93c9877d89105~mv2.png/v1/fill/w_735,h_610,al_c,q_90,enc_auto/55ae8a_b214c6cd9d2c4c898fd93c9877d89105~mv2.png)
The same principle applies to the Rectangular Marquee Tool and Polygonal Lasso Tool. Select each object, create a layer copy and then adjust the saturations.
BEFORE
![](https://static.wixstatic.com/media/55ae8a_db91fee3906141db8e3bb9c7b6cce169~mv2.jpg/v1/fill/w_980,h_613,al_c,q_85,usm_0.66_1.00_0.01,enc_auto/55ae8a_db91fee3906141db8e3bb9c7b6cce169~mv2.jpg)
AFTER
![](https://static.wixstatic.com/media/55ae8a_cb9f5db9523144f1ae409d69c1dd9c22~mv2.png/v1/fill/w_980,h_613,al_c,q_90,usm_0.66_1.00_0.01,enc_auto/55ae8a_cb9f5db9523144f1ae409d69c1dd9c22~mv2.png)
2. Magic Wand Tool
We then learned to select an image based on it's color using the magic wand tool
![](https://static.wixstatic.com/media/55ae8a_976af165aab84fb5887080ab96854e1d~mv2.png/v1/fill/w_261,h_114,al_c,q_85,enc_auto/55ae8a_976af165aab84fb5887080ab96854e1d~mv2.png)
i. Changing background color.
![](https://static.wixstatic.com/media/55ae8a_2e0d71957ebc45a1b60572559c8c8472~mv2.png/v1/fill/w_980,h_613,al_c,q_90,usm_0.66_1.00_0.01,enc_auto/55ae8a_2e0d71957ebc45a1b60572559c8c8472~mv2.png)
Using the magic wand tool we select the white backgroud
![](https://static.wixstatic.com/media/55ae8a_437495e2417640a4ad46526cd18f6099~mv2.png/v1/fill/w_980,h_613,al_c,q_90,usm_0.66_1.00_0.01,enc_auto/55ae8a_437495e2417640a4ad46526cd18f6099~mv2.png)
then we delete the background to make it transparante
![](https://static.wixstatic.com/media/55ae8a_83aa6b098f6c448587d4772903fbc24e~mv2.png/v1/fill/w_980,h_613,al_c,q_90,usm_0.66_1.00_0.01,enc_auto/55ae8a_83aa6b098f6c448587d4772903fbc24e~mv2.png)
Make a new layer below the duck image, then select solid color to change
the background color.
VOILA~
Before:
![](https://static.wixstatic.com/media/55ae8a_1b4916dbeec94b36b320bbbd9d2163cc~mv2.jpg/v1/fill/w_500,h_546,al_c,q_80,enc_auto/55ae8a_1b4916dbeec94b36b320bbbd9d2163cc~mv2.jpg)
After:
![](https://static.wixstatic.com/media/55ae8a_4fba8d4b8ad844a0bba6650337aa271b~mv2.png/v1/fill/w_500,h_546,al_c,q_85,enc_auto/55ae8a_4fba8d4b8ad844a0bba6650337aa271b~mv2.png)
ii. Selecting detailed area
![](https://static.wixstatic.com/media/55ae8a_782e16a9429649a1ad297a74681fa3f6~mv2.png/v1/fill/w_980,h_613,al_c,q_90,usm_0.66_1.00_0.01,enc_auto/55ae8a_782e16a9429649a1ad297a74681fa3f6~mv2.png)
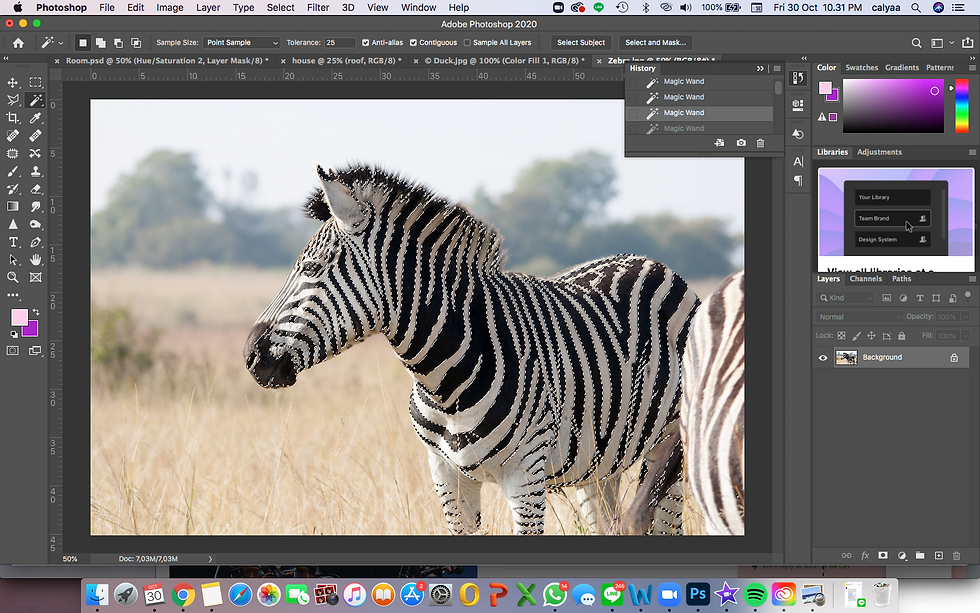
Using the magic wand tool we're going to select the black stripes of the zebra
NOTE: to erase parts of the selection use option, and to decrease wand size adjust tolerance
![](https://static.wixstatic.com/media/55ae8a_a6b90c9c3d534c1ab1daba4355c2b995~mv2.png/v1/fill/w_980,h_613,al_c,q_90,usm_0.66_1.00_0.01,enc_auto/55ae8a_a6b90c9c3d534c1ab1daba4355c2b995~mv2.png)
After you made the selection, use solid color to change the original color of the stripes. It will automatically create a new layer
![](https://static.wixstatic.com/media/55ae8a_b271ab32df6d4c35ac40d588edbc9925~mv2.png/v1/fill/w_980,h_613,al_c,q_90,usm_0.66_1.00_0.01,enc_auto/55ae8a_b271ab32df6d4c35ac40d588edbc9925~mv2.png)
adjust the layer effect to the color blend better, looking for realistic
RESULTS
before
![](https://static.wixstatic.com/media/55ae8a_ee47f0da93e94310bc2004b57dc21f80~mv2.jpg/v1/fill/w_980,h_653,al_c,q_85,usm_0.66_1.00_0.01,enc_auto/55ae8a_ee47f0da93e94310bc2004b57dc21f80~mv2.jpg)
after
![](https://static.wixstatic.com/media/55ae8a_ab759d290fa641879a28064d0d3e62e3~mv2.png/v1/fill/w_980,h_653,al_c,q_90,usm_0.66_1.00_0.01,enc_auto/55ae8a_ab759d290fa641879a28064d0d3e62e3~mv2.png)
3. Creating a house using shapes and marquee tools
![](https://static.wixstatic.com/media/55ae8a_5d10db4f5d424bb7ba26762e29fd3c04~mv2.png/v1/fill/w_980,h_613,al_c,q_90,usm_0.66_1.00_0.01,enc_auto/55ae8a_5d10db4f5d424bb7ba26762e29fd3c04~mv2.png)
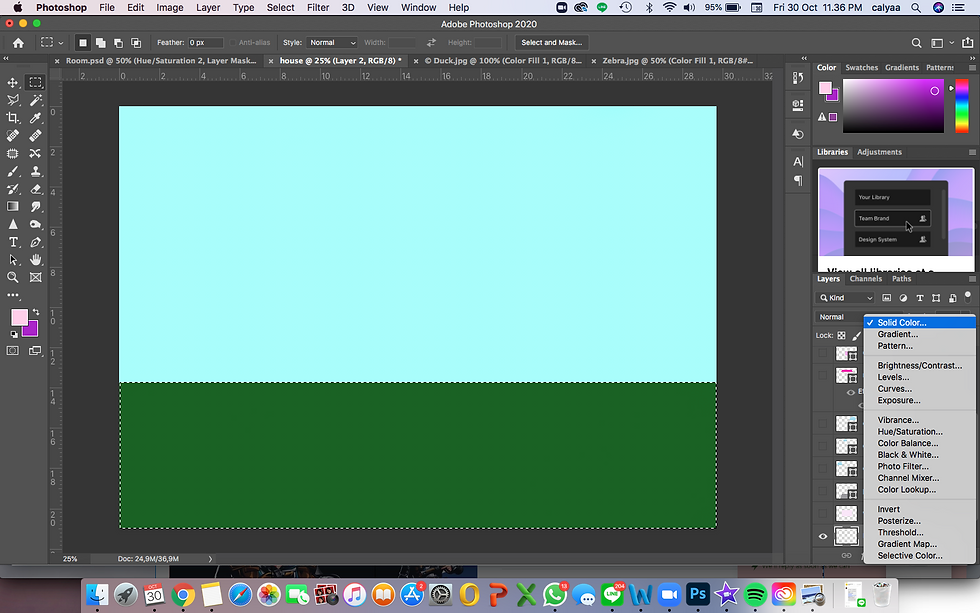
First make the background a sky color then using the rectangular marquee tool create the grass. Using solid color again, fill in a green color
![](https://static.wixstatic.com/media/55ae8a_bdaf71d959d747baa1024a2f8bbd1484~mv2.png/v1/fill/w_980,h_613,al_c,q_90,usm_0.66_1.00_0.01,enc_auto/55ae8a_bdaf71d959d747baa1024a2f8bbd1484~mv2.png)
On a new layer, start building the house wall using the same technique
![](https://static.wixstatic.com/media/55ae8a_8087b3ac62e24a828903c218599991df~mv2.png/v1/fill/w_980,h_613,al_c,q_90,usm_0.66_1.00_0.01,enc_auto/55ae8a_8087b3ac62e24a828903c218599991df~mv2.png)
![](https://static.wixstatic.com/media/55ae8a_3a04e9abe6834f53b2cb0bf91b9fd4f1~mv2.png/v1/fill/w_980,h_613,al_c,q_90,usm_0.66_1.00_0.01,enc_auto/55ae8a_3a04e9abe6834f53b2cb0bf91b9fd4f1~mv2.png)
Then create another new layer for the road. This time we're going to warp it to it shapes like a trapezium. Select transform perspective and create the shape.
![](https://static.wixstatic.com/media/55ae8a_68d6bbfa46964ff29c69e6635d3900ac~mv2.png/v1/fill/w_980,h_613,al_c,q_90,usm_0.66_1.00_0.01,enc_auto/55ae8a_68d6bbfa46964ff29c69e6635d3900ac~mv2.png)
pinch the upper left or right point inwards then it should look like this
![](https://static.wixstatic.com/media/55ae8a_b9cadd4e60694a3386298b45fe6c6e6c~mv2.png/v1/fill/w_980,h_613,al_c,q_90,usm_0.66_1.00_0.01,enc_auto/55ae8a_b9cadd4e60694a3386298b45fe6c6e6c~mv2.png)
using the same technique, make the roof
![](https://static.wixstatic.com/media/55ae8a_6eed98abf2e74e80b44f6fed86525296~mv2.png/v1/fill/w_980,h_613,al_c,q_90,usm_0.66_1.00_0.01,enc_auto/55ae8a_6eed98abf2e74e80b44f6fed86525296~mv2.png)
After creating the door and window, you have your finished house
THE END RESULT
![](https://static.wixstatic.com/media/55ae8a_059d0b3756e4409f98f03e39ec0d5d80~mv2.png/v1/fill/w_980,h_693,al_c,q_90,usm_0.66_1.00_0.01,enc_auto/55ae8a_059d0b3756e4409f98f03e39ec0d5d80~mv2.png)
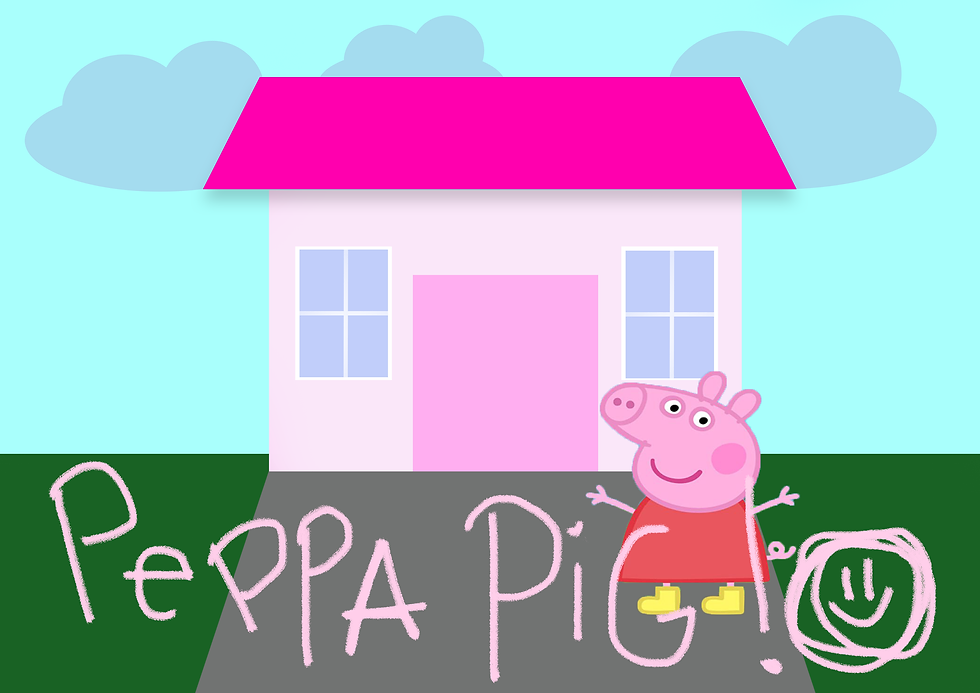
the house looked like peppa pig's house so I added clouds, the pig and a text :)
Comments